

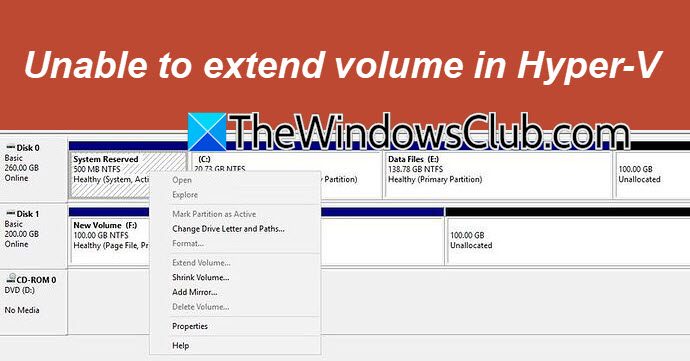

When managing Hyper-V VMs, one crucial task is extending disk space. You can allocate more space to your VM in its settings, but when you try to extend the volume, you may notice that Extend volume is greyed out. In this post, we’ll cover this issue and what you can do if you can’t extend the volume in Hyper-V.
How to increase Disk Size in Hyper-V?
To increase Disk Size in Hyper-V:
- Open Hyper‑V Manager and shut down the virtual machine.
- Right‑click the VM
- Go to Settings and select the Hard Drive.
- Click Edit and then choose Expand in the wizard.
- Enter the new size (larger than current value) and continue with the wizard.
- Start the VM, then extend the partition inside the guest OS using Disk Management.
Unable to extend volume in Hyper-V
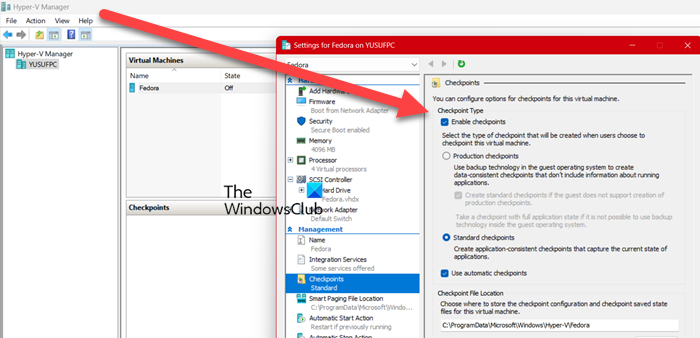
When you increase the size of a virtual hard disk (VHDX) file in Hyper-V Manager, you are only raising the maximum capacity of the disk. The guest operating system in the virtual machine will still see the new space as Unallocated Space. The Extend Volume option in Windows Disk Management is greyed out because of a key rule: Windows can expand an NTFS volume only if there is contiguous Unallocated Space immediately to the right of it. If this empty space is separated from your target volume (usually the C: drive) by even a small partition, like the Windows Recovery Environment (WinRE) partition, the Extend Volume option remains disabled. Other reasons this option may be disabled include the disk being formatted as MBR (which can only hold 2TB), the volume not being NTFS, or a Hyper-V Checkpoint locking the virtual disk file.
Hyper-V Extend volume greyed out
If you can’t extend the volume in Hyper-V, follow the solutions below.
- Delete the blocking recovery partition
- Use DiskPart to extend the volume directly
- Convert the Disk from MBR to GPT
Let us talk about them in detail.
1] Delete the blocking recovery partition
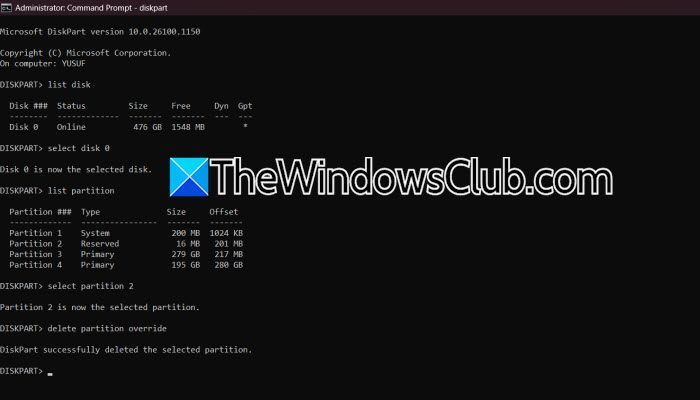
After successfully expanding the VHDX in Hyper-V Manager, if there is unallocated space blocked by a small recovery partition, you need to delete that blocking recovery partition using the diskpart utility.
First, open an elevated Command Prompt inside the virtual machine. Now, type diskpart and press Enter.
Type list disk and press Enter. Identify the disk number that holds your C: drive (usually Disk 0).
Type select disk 0 (replace 0 with your disk number if different) and press Enter.
Now, type list partition and press Enter. Look for the small partition (often 500–700 MB) between your C: drive and the unallocated space and note its Partition ### number.
You then have to type select partition 4 (replace 4 with the correct number for your recovery partition) and press Enter. Make sure to double-check the selection.
Type delete partition override and press Enter. This removes the recovery partition and converts its space to Unallocated.
Type exit to close DiskPart.
Now open Disk Management. You will see a single, larger block of Unallocated Space now sitting directly to the right of your C: drive.
Right-click the C: drive > Extend Volume… > Click Next > Next > Finish. The unallocated space will be seamlessly merged into your C: drive.
2] Use DiskPart to extend the volume directly
The DiskPart extend command works like Disk Management but often succeeds when the tool fails due to display issues or minor file system problems. It directly tells the NTFS file system to expand into available space next to it. If the empty space is right next to the volume on the right, DiskPart will extend it without the GUI’s limitations.
Open an elevated Command Prompt and type diskpart and press Enter.
Type list volume and press Enter. Find the Volume ### associated with your C: drive (or the volume you want to extend).
Type select volume C (replace C with the correct volume letter or number) and press Enter.
Type extend and press Enter.
If you want to use all available space, type extend.
To use a specific amount, type extend size=10240 (for 10GB, for example).
If successful, you will see a message: DiskPart successfully extended the volume. Type exit to close.
This should do the trick.
3] Convert the Disk from MBR to GPT
The Master Boot Record (MBR) partitioning scheme has a hard limit of 2TB for the entire disk. If your virtual disk is larger than 2TB, any single partition cannot exceed that limit, and you cannot extend a volume beyond it. The GUID Partition Table (GPT) scheme supports much larger disks (up to 9.4 ZB). Converting the disk to GPT removes the 2TB barrier, letting you extend the volume to the full capacity of the VHDX.
To convert the disk from MBR to GPT, follow the steps mentioned below.
- Back up the VM immediately. Use a Hyper-V Checkpoint or export the VM.
- Inside the guest OS, open an elevated Command Prompt.
- Verify the disk is MBR by running diskpart, then list disk, then select disk 0, then detail disk. The output will state Partition Style: MBR.
- Type exit to leave DiskPart.
- Run the built-in conversion tool:
mbr2gpt /validate /disk:0 /allowFullOS(assuming Disk 0) to check compatibility. - If validation succeeds, run the command:
mbr2gpt /convert /disk:0 /allowFullOS.
Shut down the VM completely. In the VM’s Hyper-V Settings, ensure the Firmware is set to use a Generation 2 VM (which requires UEFI/GPT) or that the VM is configured for UEFI. Boot the VM. You can now create partitions larger than 2TB.
That’s it!
Read: Fix 0x800f080c Hyper-V error on Windows 11
How to extend volume in Hyper-V?
Extending a volume in Hyper-V means expanding the VHDX on the host first, then extending the volume inside the guest. Shut down the VM, use Hyper-V Manager’s Edit Disk or PowerShell’s Resize-VHD to make the virtual disk larger. Boot the VM, open Disk Management, and if Extend Volume is greyed out because a recovery partition blocks the free space, delete that partition with DiskPart. After that, the unallocated space becomes contiguous, and you can extend the C: drive normally.
Read: Unable to install Hyper-V in Windows Server virtual machine
Why can’t I increase the disk size in VMware?
You usually can’t increase the disk size in VMware because the VM has snapshots, is powered on, or uses a linked clone or RDM disk. Snapshots lock the base VMDK in a differencing chain, so the Expand option stays greyed out until you consolidate or delete them. Power off the VM completely, expand the disk in its settings, then extend the volume inside the guest OS. If it still won’t work, check for linked clones or RDM disks, which you must resize at the storage level instead.
Also Read: Hyper-V failed to connect to local computer.
